Creating custom tree views part 1
In the context of xeokit-sdk, metadata provides information about models beyond their geometrical shapes.
It includes data like names, identifiers, hierarchical graphs, properties etc.
One of the most common uses of metadata with xeokit-sdk has been the TreeViewPlugin.
The plugin renders metadata in a form of DOM trees, where nodes correspond to geometrical shapes or their collections, organized by different hierarchies.
TreeViewPlugin provides a lot of features that help customize its form and function.
It's not uncommon however for users to find uses and requirements for a DOM tree that exceed customizability of the TreeViewPlugin.
This is the first part in a series of articles that demonstrates how metadata can be used directly in an application layer to present it in more user-specific ways.
The article demonstrates how to render a custom DOM tree in a browser, based on xeoRvt output.
Introduction
xeoRvt tool converts an .rvt file to a .glb file containing input geometries, and a .json file representing input data structures extracted from its document. By default xeoRvt outputs data of elements visible in the .rvt file's Active View, or in the "{3D}" view if the active view is not a 3D view.
Output format
This section describes data organization of xeoRvt's output metadata.
Feel free to skip it on first read, as most of the concepts are investigated gradually by following sections.
xeoRvt's output metadata JSON file represents a data structure with following properties:
-
Categories: an array of Categories, each of which contains following properties:
- Id: Id of the Category
- Name: Name of the Category
-
Elements: an array of Elements, each of which contains following properties:
- class: class of the Element
- Id: Id of the Element
- Name: Name of the Element
- (one of) Category / Family / Type: optionally corresponds to type hierarchy of the Element => an index to the Categories or Elements array entry that represents the Category, Family, or Type
- Level: optional Level of the Element => an index to the Elements array entry that represents the Level
- ParameterGroups: optional array of Element's ParameterGroups => each array's member being an index to the ParameterGroups array entry
- appearances: optional array of names of related glb meshes
-
ParameterGroups: each member contains following properties:
- Name: Name of the group
- Parameters: an array of ParameterGroup's Parameters => each array's member being an index in the Parameters array entry
-
Parameters: each member contains following properties:
- Name: Name of the Parameter
- Value: Value of the Parameter
- Unit: optionally the Parameter can refer to a Unit, which is an index to the Units array entry
-
Units: each member contains following properties:
- Name: Name of the Unit
Instances list
We'll start with a basic JS implementation of a DOM tree containing a list of Family Instances from an .rvt file.
Run this example
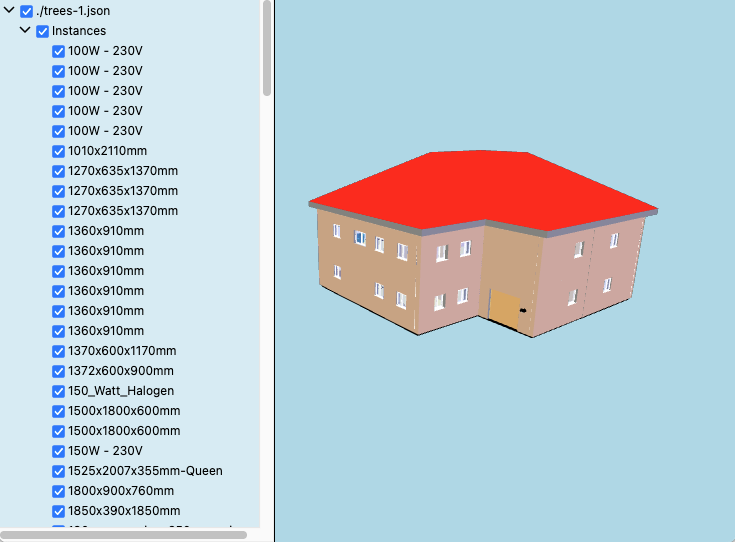
First step is to load xeoRvt's output .glb and .json files.
const document = window.document;

const viewer = new Viewer({ canvasElement: document.getElementById("myCanvas") });

// Load the .json file
fetch(metaUrl).then(response => {
    response.json().then(metadata => {

        // Load the .glb file
        const model = new GLTFLoaderPlugin(viewer).load({ src: modelUrl });
        model.on("loaded", () => {
Family Instance is a kind of an Entity, and a member of the metadata.Entities array.
Each Entity, among other properties, defines its Name and Id.
A relationship between a Family Instance and its geometrical representation is determined by a list of its appearance Ids.
A single Family Instance can potentially have multiple appearances for different views.
In our simple scenario we only export a single view, so the first Element's appearance is the one to "connect" with the Element.
When a .glb file is loaded, all meshes are placed in the SceneModel's objects map.
const getDrawable = e => e.appearances && (e.appearances.length > 0) && model.objects[e.appearances[0]];
Finally, a general tree structure is created based on .rvt-specific data, and rendered as DOM nodes using the appendTree function.
            appendTree({
                name:     metaUrl,
                children: [
                    {
                        name:     "Instances",
                        children: metadata.Elements.filter(getDrawable).map(e => ({
                            name:     e.Name || `[${e.class} #${e.Id}]`,
                            drawable: getDrawable(e)
                        })).sort((a, b) => a.name.localeCompare(b.name))
                    }
                ]
            });
        });
    });
});
The appendTree's definition provided below recursively processes nodes and their children, rendering DOM nodes representing the data.
It starts with a number of helper definitions.
const appendTree = (function() {
    const px = v => `${v}px`;

    // Helper function to create an absolutely positioned div parented by the page's body element
    const createAbsolutePanel = () => {
        const panel = document.createElement("div");
        document.body.appendChild(panel);
        panel.style.backgroundColor = "rgba(255, 255, 255, .5)";
        panel.style.border = "1px solid black";
        panel.style.boxSizing = "border-box";
        panel.style.font = "12px -apple-system, BlinkMacSystemFont, 'Segoe UI', Roboto, 'Helvetica Neue', Arial, sans-serif, 'Apple Color Emoji', 'Segoe UI Emoji', 'Segoe UI Symbol'";
        panel.style.maxHeight = "100%"; // needed to show vertical scroll
        panel.style.maxWidth = "300px";
        panel.style.overflow = "auto";
        panel.style.position = "absolute";
        panel.oncontextmenu = evt => evt.preventDefault();
        return panel;
    };

    // Helper function that creates a caret sign to be used as a fold indicator
    const createCaretIcon = (caretSize) => {
        const svgNS = "http://www.w3.org/2000/svg";
        const svg = document.createElementNS(svgNS, "svg");
        svg.setAttribute("viewBox", `0 0 ${caretSize} ${caretSize}`);
        svg.setAttribute("width", caretSize);
        svg.setAttribute("height", caretSize);
        svg.setAttribute("fill", "none");
        svg.setAttribute("stroke", "currentColor");
        svg.setAttribute("stroke-width", "1.5");
        const path = document.createElementNS(svgNS, "path");
        path.setAttribute("d", "m6 3 5 5-5 5"); // depends on caretSize too
        svg.appendChild(path);
        return svg;
    };

    return metaroot => {
Each node on the tree will use a checkbox to toggle its own, and its descendants' visibility.
To also reflect visibility changes that occur outside of the tree, an objectVisibility handler is registered on the scene, that causes the tree to reevaluate all checkboxes.
        // The ignoreSceneObjectVisibility variable is used to disable objectVisibility handler
        // when object's visibility is changed from the tree
        let ignoreSceneObjectVisibility = false;
        viewer.scene.on("objectVisibility", entity => (! ignoreSceneObjectVisibility) && rootNode.reevaluateCheck());

        const treeViewContainer = createAbsolutePanel();
        treeViewContainer.style.left = "0px";
        treeViewContainer.style.userSelect = "none";
A recursive function renderNode is called with each node to render its DOM node structure, including a name row and children div.
        const rootNode = (function renderNode(node, parentElement, depth) {
            // For each node create its main domElement
            const domElement = document.createElement("div");
            parentElement.appendChild(domElement);

            // Inside a domElement create a nodeElement for this node's details ...
            const nodeElement = document.createElement("div");
            domElement.appendChild(nodeElement);

            // ... and a childrenDiv for the node's children
            const childrenDiv = document.createElement("div");
            domElement.appendChild(childrenDiv);

            // Render children recursively
            const children = (node.children || [ ]).map(child => renderNode(child, childrenDiv, depth + 1));

            // Adjust node's details div
            nodeElement.style.paddingLeft = px(depth * 16);
            nodeElement.style.paddingRight = px(5);
            nodeElement.style.pointerEvents = "all";
            nodeElement.style.textWrap = "nowrap";
A caret is added in from of a name of a node, to control its children div visibility.
            // Add the node's details div's caret icon and a dblclick handler to fold and expand the childrenDiv
            let expanded = false;

            const updateExpanded = (function() {
                const expandToggleElement = createCaretIcon(16);
                expandToggleElement.style.cursor = "pointer";
                expandToggleElement.style.display = "inline-block";
                expandToggleElement.style.transition = "transform 0.1s";
                expandToggleElement.style.visibility = (children.length > 0) ? "visible" : "hidden";
                nodeElement.appendChild(expandToggleElement);

                expandToggleElement.addEventListener("click", evt => {
                    evt.preventDefault();
                    evt.stopPropagation();
                    expanded = ! expanded;
                    updateExpanded();
                });
                return () => {
                    expandToggleElement.style.transform = expanded ? "translate(2px, 2px) rotate(90deg)" : "translate(3px, 3px)";
                    childrenDiv.style.display = expanded ? "" : "none";
                };
            })();
            updateExpanded();
Children visibility is also toggled on double click for nodes that have children.
Otherwise a click causes the camera flight to the node's drawable.
            const nodeDrawable = node.drawable;

            nodeElement.addEventListener("dblclick", (nodeDrawable
                                                      ? (() => {
                                                          nodeDrawable.selected = ! nodeDrawable.selected;
                                                          if (nodeDrawable.selected) {
                                                              viewer.cameraFlight.flyTo(nodeDrawable);
                                                          }
                                                      })
                                                      : (() => { expanded = !expanded; updateExpanded(); })));

            // Highlight the node's div on mouseenter, and dehighlight on mouseleave
            nodeElement.addEventListener("mouseenter", () => nodeElement.style.backgroundColor = "rgb(0,0,0,0.15)");
            nodeElement.addEventListener("mouseleave", () => nodeElement.style.backgroundColor = "");
A checkbox is added for each node that has either a drawable or children.
            // Add a checkbox that controls the node's and its children visibility - only if the node has children or points to a drawable
            const setSubtreeVisible = visible => {
                if (nodeDrawable) {
                    nodeDrawable.visible = visible;
                }
                children.forEach(child => child.setSubtreeVisible(visible));
            };

            const checkbox = (nodeDrawable || ((children.length > 0) && children.some(c => c.isChecked))) && document.createElement("input");
            if (checkbox) {
                checkbox.type = "checkbox";
                checkbox.style.cursor = "pointer";
                checkbox.style.position = "relative";
                checkbox.style.transform = "translate(0px,2px) scale(0.9)";
                checkbox.style.transformOrigin = "center center";

                checkbox.addEventListener("dblclick", evt => evt.stopPropagation()); // to prevent nodeElement::dblclick
                checkbox.addEventListener("click", evt => evt.stopPropagation()); // to prevent nodeElement::click
                checkbox.addEventListener("change", evt => {
                    ignoreSceneObjectVisibility = true;
                    setSubtreeVisible(checkbox.checked);
                    ignoreSceneObjectVisibility = false;
                    rootNode.reevaluateCheck();
                });
                nodeElement.appendChild(checkbox);
            } else {
                const span = document.createElement("span");
                span.innerHTML = "      ";
                nodeElement.appendChild(span);
            }
The node's DOM row ends with the node's name.
            // Render the node's name
            const nameSpan = document.createElement("span");
            nameSpan.textContent = node.name;
            if (nodeDrawable) {
                // Add a objectSelected handler to change font weight to bold if node's drawable is selected
                const updateFontWeight = () => nameSpan.style.fontWeight = nodeDrawable.selected ? "bold" : "";
                viewer.scene.on("objectSelected", entity => { if (entity === nodeDrawable) updateFontWeight(); });
                updateFontWeight();
            }
            nodeElement.appendChild(nameSpan);

            // Function to update the state of the checkbox, to reflect its own and its children state
            const updateChecked = () => {
                if (checkbox) {
                    checkbox.checked       = ((! nodeDrawable) || nodeDrawable.visible) && children.every(n => (! n.isChecked) || n.isChecked());
                    checkbox.indeterminate = (! checkbox.checked) && children.some(n => n.isChecked && (n.isChecked() || n.isIndeterminate()));
                }
            };

            updateChecked();

            return {
                children:          children,
                setExpanded:       exp => { expanded = exp; updateExpanded(); },
                isChecked:         checkbox && (() => checkbox.checked),
                isIndeterminate:   checkbox && (() => checkbox.indeterminate),
                reevaluateCheck:   () => { children.forEach(child => child.reevaluateCheck()); updateChecked(); },
                setSubtreeVisible: setSubtreeVisible
            };
        })(metaroot, treeViewContainer, 0);

        // Automatically expand the root
        rootNode.setExpanded(true);
    };
})();
Types hierarchy tree
As a next step we add the "Families" subtree, next to the "Instances" subtree, that presents Family Instances as leaves on a trees representing their type hierarchies.
Run this example
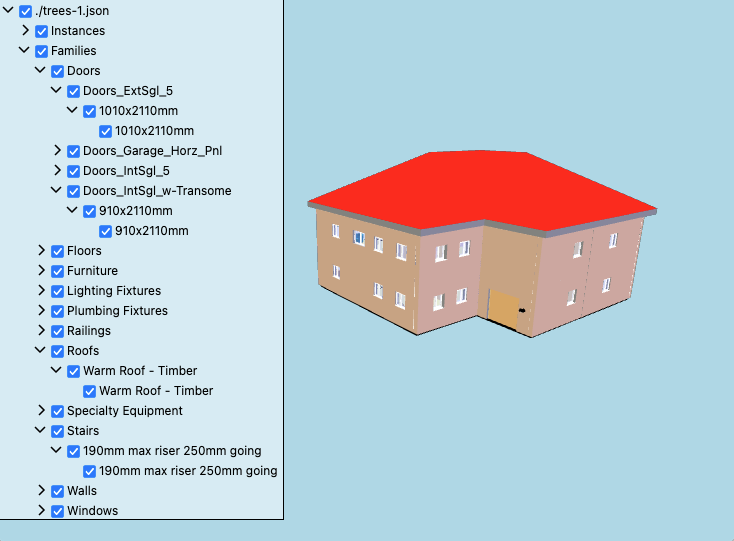
A Family Instance metadata node contains one of the Category, Family, or Type properties.
A Type node contains one of the Category or Family properties.
Finally, a Family node contains a Category property.
Each of these properties is an index of an entry in the Categories or Elements array.
To avoid repetition we abstract elementTreenode function, to be used to convert .rvt metadata nodes into general tree nodes, to be used by both "Instances" and "Families" subtrees.
            const elementTreenode = (e, children) => ({
                name:     e.Name || `[${e.class} #${e.Id}]`,
                children: children,
                drawable: getDrawable(e)
            });
We also abstract typeHierarchy function, that returns an array of subtrees corresponding to tree hierarchies of all Family Instances passing the filter test (the test will come handy in the "Levels" section).
            const Elements = metadata.Elements;

            const typeHierarchy = filter => {
                const roots = new Map();
                Elements.forEach(e => {
                    if (getDrawable(e) && filter(e)) {
                        (function rec(e) {
                            const parent = (Elements[e.Type ?? e.Family]
                                            ||
                                            metadata.Categories[e.Category]);
                            const parentMap = parent ? rec(parent) : roots;
                            if (! parentMap.has(e)) {
                                parentMap.set(e, new Map());
                            }
                            return parentMap.get(e);
                        })(e);
                    }
                });
                return (function rec(map) {
                    return [...map.entries()].map(
                        ([ e, childrenMap ]) => elementTreenode(
                            e,
                            rec(childrenMap))
                    ).sort((a, b) => a.name.localeCompare(b.name));
                })(roots);
            };
Finally a general tree is created, and passed to previously defined appendTree function.
            appendTree({
                name:     metaUrl,
                children: [
                    {
                        name:     "Instances",
                        children: Elements.filter(getDrawable).map(
                            e => elementTreenode(e)
                        ).sort((a, b) => a.name.localeCompare(b.name)),
                    },
                    {
                        name:     "Families",
                        children: typeHierarchy(e => true)
                    }
                ]
            });
Levels tree
The third major subtree, alongside "Instances" and "Families" subtrees, we add the "Levels" subtree, that presents type hierarchies similar to the ones from previous section, but this time grouped by Levels to which Family Instances are assigned.
Run this example
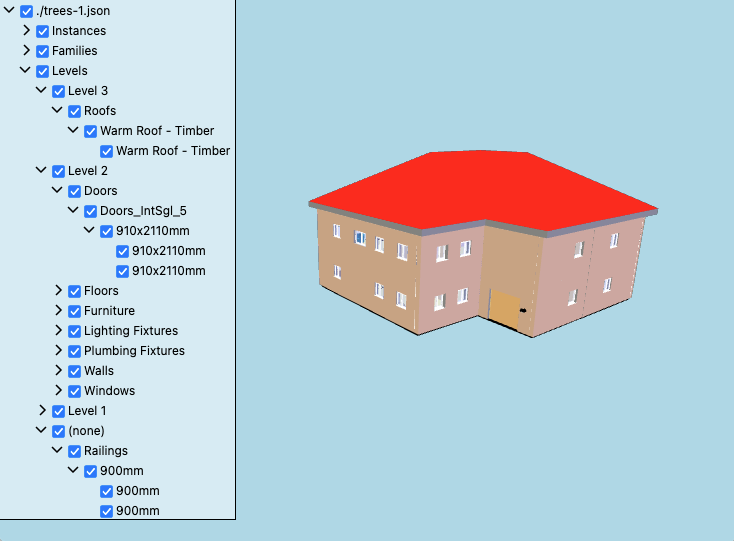
The "Levels" subtree is represented by the third child of the top-level node passed to the appendTree function, right after "Families".
Its definition goes through all members of the Elements array, and for each one with its class property equal to "Level", a general tree node is created with the Level's name, and a typeHierarchy of all Family Instances that refer to it through their Level property.
The Levels array is then sorted by their elevation, and appended one extra "(none)" node, containing all Family Instances that don't refer to any Level.
            appendTree({
                name:     metaUrl,
                children: [
                    {
                        name:     "Instances",
                        children: Elements.filter(getDrawable).map(
                            e => elementTreenode(e)
                        ).sort((a, b) => a.name.localeCompare(b.name)),
                    },
                    {
                        name:     "Families",
                        children: typeHierarchy(e => true)
                    },
                    {
                        name:     "Levels",
                        children: Elements.map((e, idx) => (e.class === "Level") && {
                            elevation: e.Elevation ?? -window.Infinity,
                            node: elementTreenode(e, typeHierarchy(e => e.Level === idx)) }
                        ).filter(v => v).sort(
                            (a, b) => b.elevation - a.elevation
                        ).map(e => e.node).concat(
                            {
                                name: "(none)",
                                children: typeHierarchy(e => typeof e.Level !== "number")
                            }
                        )
                    }
                ]
            });
Properties viewer
A significant part of .rvt metadata are properties defined for Elements.
This section will demonstrate an example of a custom properties viewer.
Run this example
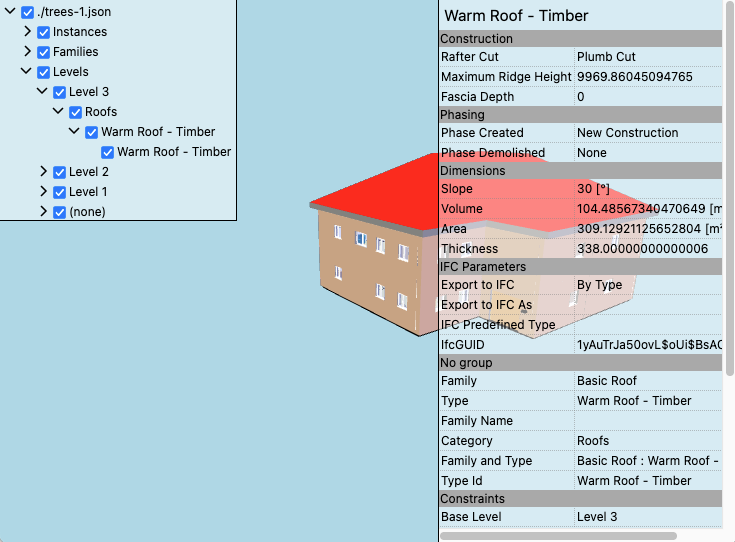
An Element optionally contains the ParameterGroups parameter, which is an index to an element of the metadata.ParameterGroups array.
Each element in that array defines the Name property, and a list of the group's parameters in a form of the Parameters property with an array of indices to the metadata.Parameters array.
Each element in the Parameters array in turn defines its Name, Value, and optionally Unit properties.
If the Unit property is defined, it is an index to the metadata.Units array, which defines string representations of the units used by Parameters.
First step to use Parameters by the appendTree function is to add them to general tree nodes created by the elementTreenode function.
            const elementTreenode = (e, children) => ({
                name:       e.Name || `[${e.class} #${e.Id}]`,
                children:   children,
                drawable:   getDrawable(e),
                properties: ("ParameterGroups" in e) && e.ParameterGroups.map(gIdx => {
                    const g = metadata.ParameterGroups[gIdx];
                    return {
                        name:       g.Name,
                        properties: g.Parameters.map(pIdx => {
                            const p = metadata.Parameters[pIdx];
                            return {
                                name:  p.Name,
                                value: `${p.Value}` + (("Unit" in p) ? ` [${metadata.Units[p.Unit].Name}]` : "")
                            };
                        })
                    };
                })
            });
The second step is to extend the appendTree function to handle provided properties.
This example does it by assigning a "click" handler to each node's DOM element, that displays a DOM table on the right hand side with all groups and properties of the clicked node.
In the appendTree's local scope we define the propsParent panel, that'll host the DOM tables for clicked nodes.
    const propsParent = createAbsolutePanel();
    propsParent.style.right = "0px";
    propsParent.style.display = "none";
Inside the renderNode recursive function we define the nodeElement's "click" handler.
nodeElement.addEventListener("click", () => {
The first thing the handler does is a cleanup of its contents, that could've belonged to another node.
                [...propsParent.childNodes].forEach(n => propsParent.removeChild(n));
                const properties = node.properties;
                propsParent.style.display = properties ? "" : "none";
If current tree node defines any properties, a DOM table is created and parented by propsParent.
                if (properties) {
                    // Create a table displaying the node's properties
                    const propsTable = document.createElement("table");
                    propsParent.appendChild(propsTable);
                    propsTable.cellPadding = "0";
                    propsTable.cellSpacing = "0";
                    propsTable.style.borderCollapse = "collapse";

                    const addRow = () => {
                        const tr = document.createElement("tr");
                        propsTable.appendChild(tr);
                        return c => {
                            const td = document.createElement("td");
                            td.innerText = c;
                            td.style.whiteSpace = "nowrap";
                            tr.appendChild(td);
                            return td;
                        };
                    };

                    const mainCell = addRow()(node.name);
                    mainCell.colSpan = "2";
                    mainCell.style.padding = px(5);
                    mainCell.style.fontSize = "1.3em";

                    (function renderProperties(properties, dep) {
                        properties.forEach((prop, idx) => {
                            if (prop.properties) {
                                const nameCell = addRow()(prop.name);
                                nameCell.colSpan = "2";
                                nameCell.style.backgroundColor = "darkgrey";
                                nameCell.style.padding = px(1);
                                nameCell.style.paddingLeft = px(1 + dep * 10);
                                renderProperties(prop.properties, dep + 1);
                            } else {
                                const propRow = addRow();
                                const propCell = c => {
                                    const cell = propRow(c);
                                    cell.style.borderStyle = "dotted";
                                    cell.style.borderColor = "#888";
                                    return cell;
                                };

                                const nameCell = propCell(prop.name);
                                nameCell.style.padding = px(2);
                                nameCell.style.paddingLeft = px(2 + Math.max(0, dep - 1) * 10);

                                const valCell = propCell(prop.value);
                                valCell.style.padding = px(2);

                                const topBorder = px((idx > 0) ? 1 : 0);
                                const botBorder = px(((idx + 1) < properties.length) ? 1 : 0);
                                nameCell.style.borderWidth = `${topBorder} 1px ${botBorder} 0`;
                                valCell.style.borderWidth  = `${topBorder} 0   ${botBorder} 1px`;
                            }
                        });
                    })(properties, 0);
                }
            });
NOTE: In the case of .rvt files, the structure is always two-tiered: a group level and a parameter level.
Presented implementation of renderProperties that handles an arbitrarily deep properties data structure will come handy in future parts of this tutorial, where we'll deal with metadata exported from formats other than .rvt.
Conclusion
In this article we have demonstrated an example of how to implement a custom tree and properties viewer based on .rvt metadata.
We hope this example will help xeokit-sdk users to integrate xeoRvt with their applications in ways that are best suited to their use cases.
Appendix: Custom tree from XKT metadata
If the application relies on the XKT format, custom trees handling can be applied to metadata from such file in a manner similar to the glb+json case.
Run this example
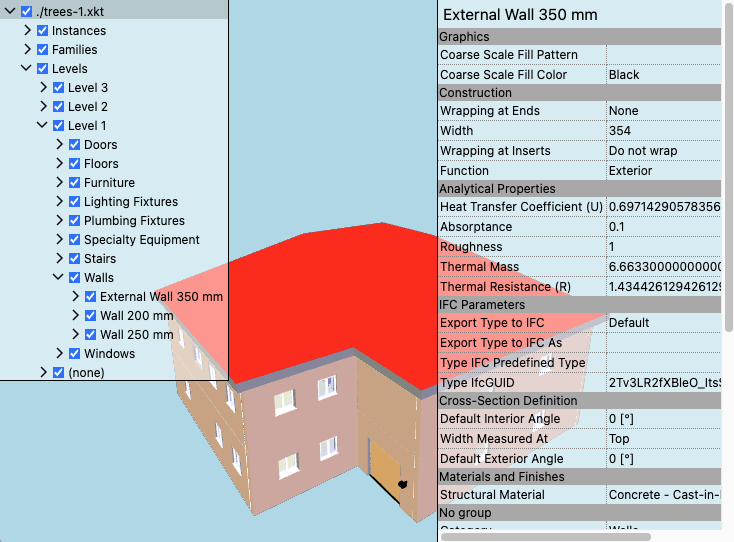
Given as an example an .xkt file created with the following command:
convert2xkt.js -s trees-1.glb -m trees-1.json -o trees-1.xkt
a web application needs to load the file using the XKTLoaderPlugin instead of the GLTFLoaderPlugin:
const xktUrl  = "./trees-1.xkt";

const model = new XKTLoaderPlugin(viewer).load({
    loadIntoMetaScene: false,
    src: xktUrl
});
In order to be able to handle the .xkt file's metadata directly by a custom tree view logic, it's required to set the XKTLoaderPlugin::load method's loadIntoMetaScene parameter to false.
This prevents the metadata from being loaded into the Viewer::metaScene hierarchy, which is not intended to be used with our custom tree view handler.
More importantly, loadIntoMetaScene: false makes the loader expose the .xkt's metadata directly as the model.metadata property.
Note that loadIntoMetaScene support has been introduced by the 2.6.111 version of xeokit-sdk.
After extracting model.metadata inside the model.on("load", ...) callback, the same handling can be applied as in the case of the glb+json scenario.
model.on("loaded", () => {
    const [ metadata, metaUrl ] = [ model.metadata, xktUrl ];
    ...